Monday, November 29, 2010

Pumpkin Sponge Cake


In today's cakes class, we had our final practical exam. Earlier in the semester, we had to submit a recipe for a three-layer cake with a filling and an icing. Chef challenged us to be creative while drawing on what we learned throughout the semester.

Over the past two months, I have been working on my recipe. My cake (which I previewed in my Thanksgiving post) is a Pumpkin Sponge Cake with Cinnamon Cream Cheese Filling, Gingersnaps and Chantilly Cream. On top of each cake layer is the cinnamon cream cheese filling. I then sprinkle on top the crushed gingersnap cookies. And I am pleased to announce that I did not overwhip my chantilly cream. The sides of my cake, the top of my cake, and my rosettes looked great. And let me tell you, it is seriously delicious.

No, seriously, it's not just my opinion. My friends Sarah and Gilly from class both liked it the first time they tasted it earlier in the semester. My friends Coleman and Brit liked it when they visited in October. My friend Bridget liked it when I took her a piece in October. My landlord and her family called it the best cake they ever ate. And my family - Joe, Jen, and Mark - gobbled it up over the Thanksgiving weekend. Not to mention, Chef and my classmates liked it as well.

I am really proud of myself today. I worked really hard on this cake, and I've worked really hard all semester to improve my cake decorating skills. It was definitely worth the time (and money, seriously, lots of money) that I spent working on this recipe. Who knows - maybe it could become my signature fall cake!

Friday, November 26, 2010

Thanksgiving

I'm so fortunate to have my brother, Joe, and my cousins, Jen and Mark, in town for the Thanksgiving holiday. So yesterday, we celebrated by honoring the tradition of a turkey dinner with all of the usual sides.

First, we put out some easy appetizers - a simple cheese and cracker tray, some veggies and fruit dip, and pumpkin dip with gingersnaps and apples (which is my Aunt Cimmie's recipe).


Next, Jen and I prepared the main meal. We dined on turkey, mashed potatoes, gravy, stuffing (which Mark only refers to as dressing because it wasn't actually stuffed into the turkey and which is my Aunt Donna's recipe), corn, green bean casserole, and my homemade croissants.


And finally, I put out a dessert spread: german chocolate cake (from my class), pumpkin nut roll, apple pie, and my pumpkin sponge cake with cinnamon cream cheese filling and crushed gingersnaps.


All in all, it was a delicious meal. We also honored the tradition of watching football and lounging around, but we also played some really great trivia games. It was a great holiday celebration.

Wednesday, November 24, 2010

Jersey Style Sticky Buns & Giant Cinnamon Rolls


In Tuesday's laminated doughs class, we made Jersey Style Sticky Buns and Giant Cinnamon Rolls. These are by far the best sticky buns and cinnamon rolls I have ever made. The sticky buns have a top smear that contains bourbon, raisins and pecans. The cinnamon rolls have an icing that is white chocolate and cream cheese. Both amazingly delicious.

Monday, November 22, 2010

German Chocolate Cake

In today's cakes class, we made my all-time favorite cake: German Chocolate. This cake actually originated in the US, not in Germany as many would believe. In 1852, a man named Sam German worked at Baker's Chocolate Company - you know, Baker's of the squares of chocolate you can buy in the grocery store. Anyway, Sam German created a new formula for chocolate, and the company called it, Baker's German's Sweet Chocolate. In 1957, a woman in Texas was first to publish a recipe using this chocolate of Sam's, thus giving it the name German's Chocolate Cake. Over time, the possession was dropped, and we've been referring to it ever since as German Chocolate Cake. Interesting stuff.

My mom used to make German Chocolate Cake and I fell in love with it early in my life. It contains three of my favorite foods: chocolate, pecans, and coconut.

We made our cakes today by preparing the batter and baking the cakes in separate layers; again, we didn't have to slice the cake layers so that was a nice bonus. To make the filling, we heated evaporated milk, sugar, egg yolks, and butter over medium heat, until the mixture thickened. We took the mixture off the heat to add coconut, vanilla, and pecans. We placed the pot in a water bath to cool the temperate and help the mixture thicken. I didn't hesitate to sample the filling.

We made an Italian Buttercream with meringue. While similar to a Swiss Buttercream, the Italian Buttercream is made by heating sugar and water to 250 degrees F, creating a syrup. We then whipped egg whites to a stiff peak and slowly added the sugar syrup. Once the temperature cooled slightly, we added softened butter and continued to whip. Finally, salt and vanilla were added to help in the flavoring, and we whipped the whole mixture until it came together as buttercream.


To put this cake together, we placed down a cake layer, then piped buttercream around the edge. We then placed the coconut/pecan filling on the cake layer. We repeated this on the second layer. After the top layer was placed, we iced the sides with buttercream, and then covered the sides completely with toasted coconut. To finish the top, we piped a reverse shell border of buttercream, and then filled it in with the coconut/pecan filling.

Traditionally, German Chocolate Cake does not have an outer layer of icing. The cake is often left un-iced to show the layers. While I liked this cake, I would agree with the tradition that the outer icing isn't necessary. The cake is delicious as is with just the filling. And yes, I brought this one home to enjoy during the upcoming week and Thanksgiving holiday!

Sunday, November 21, 2010

Exam Day

In last Thursday's laminated doughs class, we had our midterm practical exam. I had to make classic croissants and pain au chocolate. Overall, it went pretty well. The class environment was a little crazy, but it was definitely a worthwhile exercise. In my afternoon class, I baked a pecan chiffon genoise cake, which I'll decorate next Tuesday. My photos didn't turn out too well, since I was a bit rushed, so sadly I have nothing for you to view, but I promise some photos next week. Lots of cakes happening.

Wednesday, November 17, 2010

Quiche and Custard Pie


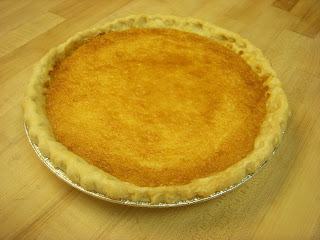
In Tuesday's Bakeshop class, we made quiche and coconut custard pie. I like recipes like this because the same pie dough can be used for both a savory concept (the quiche) and a sweet concept (the pie or tart). My quiche had spinach, bacon, and cheddar cheese, and it was absolutely delish. We haven't yet sampled the coconut custard pie, which we'll do on Thursday, but I love coconut so I am sure I will enjoy it.

Fleur Style Danish and Savory Croissants

In Tuesday's Laminated Doughs class, we made Fleur Style Danish and Savory Croissants. Fleur Style Danish refers to the shape of the product. Basically, you cut the dough into squares, stretch the corners, and then fold the corner into the center. The dough is then proofed, a hole is formed in the center, and then the product is filled before baking. Chef let us experiment with a filling so Gilly and I made a filling with dried apricots and pistachios; we flavored it with honey, star anise, thyme, and lemon. Sadly, our dough didn't perform that well and our product didn't rise nicely before baking or during baking. The consensus of the limited rise is due to the yeast we used; we normally use fresh yeast but we only had dry yeast available, and it just didn't perform. The danish still look good, and I liked the taste of them, so it was a good lesson:


The savory croissants tend to be filled with things like ham and cheese. We didn't have ham available, so I made mine with pepperoni, cheese, black pepper, garlic salt, and fresh oregano. These were shaped like a traditional croissant:


Savory croissants inspired the now popular "Hot Pockets" so I asked Chef if he would play one of my favorite comedic acts of all time - Jim Gaffigan's Hot Pockets. I seriously love this clip and always laugh even though I know exactly what Gaffigan is going to say. If you're never seen/heard it, it's worth a look so I am giving you the link. Enjoy!

http://www.youtube.com/watch?v=N-i9GXbptog

Tuesday, November 16, 2010

Square Birthday Cake

In Monday's Cakes class, we made a 7 inch square cake. The cake itself was coconut, which I love and the icing was a Swiss Buttercream. To make this cake, we spread out large amounts of batter in a full sheet pan; after baking, we cut 7 in squares of cake which was definitely an easier process than slicing the round cakes.

The Buttercream was made like we've done in the past. We decorated the cake in a similar fashion, putting buttercream and simple syrup between the cake layers, and covering the entire cake in buttercream. Icing the sides of a square cake is a new challenge, particularly in trying to get straight sides, firm corners and generally nice edges. We also used buttercream to pipe a shell border on the bottom of the cake and around the edge of the cake.

In our downtime, we also made marzipan rosebuds and leaves which were used for decoration atop the cake. I had never worked with marzipan (which is almond paste and sugar) so this was another new experience for me. And finally, we used chocolate to pipe a message on the cake.


I had some difficulty with my edges, particularly the corners, and my shell border was a bit too big. My rosebuds and leaves turned out pretty good and my piping was OK. I had to take my initial attempt at "happy" off the cake, thus ruining the flat top, but the new piping was much better so it was worth it overall. In general, it was a pretty good day for the first attempt at a square cake, but I am starting to understand more and more why fondant is a popular choice for cake decorating.

Sunday, November 14, 2010

Pizza

In Thursday's Bakeshop class, we made personal 10 inch pizzas. Nothing too fancy here, but a quick and easy pizza dough recipe. I chose to put spinach and olives on my pizza, and it made for a satisfying dinner after class.

Scones, Elephant Ears, and Bear Claws

During Thursday's Laminated Doughs class, we made a variety of items: scones, elephant ears, and bear claws. It was a really fun day with lots of new techniques.

Scones have become more popular in America as a breakfast item, but traditionally, they are reserved for tea time snacks in countries like England. We made traditional scones with buttermilk and currants. This process is all done free handed. My scones were slightly too large and some of them baked on a slant. I started calling them "slanted scones" and Chef and a few others agreed that "Slanted Scone" could be a great name for a bakery. Anyway, here's a snapshot of my scones which were finished with a flat icing:


We next made Austrian Elephant Ears. This is done by rolling out a large piece of croissant dough, which is egg washed and covered with a nut mixture combined with cinnamon and sugar. We chose to use pecans for this, giving them a southern flare. Traditional elephant ears would have almonds or walnuts. After the filling is spread over the dough, Gilly and I worked from opposite ends to jelly roll both sides of the dough and meet in the middle. We then flipped the entire piece of dough to cut pieces, which were then proofed. After baking, they were glazed:


We then made bear claws. Again we started with a large piece of dough. We then piped frangipane in a line along the edge and sprinkled almonds over it. We again jelly rolled the dough and then cut the dough after the jelly roll completed a full circle. We cut the dough into 3.5 inch pieces and then made four cuts to give the dough a claw-like appearance. These were dusted with powdered sugar after baking:


Both are a pretty big treat, and both tasted great.

Oreo Cookie Cake


In Tuesday's Bakeshop class, we made an Oreo Cookie Cake, utilizing the cake we baked during the previous class. I learned some new pointers about cake decorating so this was extremely helpful for me. Like we usually do, we cut our cake into three equal cake layers and I did a pretty good job on this. I learned a new trick that seemed to help. We also used a Swiss Buttercream for this recipe.

Between each cake layer is the Swiss Buttercream and then crushed oreo cookies. For the exterior of the cake, we didn't fully ice the sides, but instead did a crumb coat - this is the process of icing a very thin layer and then covering the icing completely - and we did this with the crushed oreos.

On the top, we divided the cake into 12 equal slices instead of the usual 16. Chef allowed us to decorate each slice however we wanted so I challenged myself to practice rosettes and again did a pretty good job on this. I feel like I am starting to get a better grip on the cakes and having some instruction from a different Chef with a fresh perspective seemed to really help.

Saturday, November 13, 2010

Doughnut Day!

Most of the people I know celebrate Doughnut Day in February, on the Tuesday before the beginning of Lent. For my laminated doughs and pastries class, though, Doughnut Day came on a Tuesday in November.

Obviously, doughnuts are not a laminated product, but they are a popular breakfast and bakery item so Chef believes it is necessary (and fun) to expose us to some proper doughnut preparation. We used a process similar to bread dough preparation to make the doughnut dough. First we made a sponge - bread flour, milk, and yeast - and allowed that to proof. We then added that to more bread flour, milk, eggs, vanilla, sugar, salt, butter and either nutmeg or mace for seasoning. After the dough had time to proof, we manipulated it into four types of doughnuts.

Traditionally, doughnuts were made without holes, but it was discovered that the small hole in the middle allows the doughnut to fry more evenly for an overall even bake. We made doughnuts with holes and doughnuts without holes. We used the scraps to form twisted doughnuts. And finally, we made an apple filling and pate a choux (the dough used to make eclairs and cream puffs) to make apple fritters.

After the proper amount of proofing, we fried our first two batches of doughnuts in oil at 365 degrees F. After cooling, the regular doughnuts were glazed, and the doughnuts without holes were filled with marmalade and covered in sugar.


We next fried the twists and immediately covered them in cinnamon and sugar. And finally, the apple fritters were fried and later glazed as well.


This was great practice for working with yeast dough for doughnuts. Other types of doughnuts are made with a cake like batter. I'll be interested in experimenting with doughnuts in the future. And I know my friend Laraine will be really pleased because she and I always get together over holidays to eat doughnuts, drink coffee, and catch up. Sorry, Dunkin Donuts, but you know have some competition for Laraine's doughnut affection! :)

Red Velvet Cake

In Monday's cakes class, we made Red Velvet Cake. Many people seem to get really excited about Red Velvet Cake so this is a good recipe to know. We began as we always do by preparing the 10 inch cake rounds and making the batter. This time, we baked the layers as individual layers so we didn't have to do any cutting of a large cake - that's always a bonus.

Red Velvet Cake was a popular cake at the Waldorf-Historia Hotel in New York. There's an urban legend that says a woman in the 1960s asked for the recipe when she ordered this as dessert. When she received her bill, she was charged a large amount of money for the recipe. A bit peeved, she is rumored to have sent a chain letter with copies of the recipe therefore spreading the recipe all over the place.

In today's world, the red color comes from food coloring. Traditionally, the red color came from the Dutch Processed Cocoa that was used in the cake. At times, beets can also be used. This is actually a popular choice when making a devil's food cake or a red velvet cake.

Traditionally, Red Velvet Cake is iced with a Swiss Buttercream. You're probably thinking that you eat Red Velvet Cake with a cream cheese frosting, and this is more popular today, but traditionally, it was Swiss Buttercream. So we made the Swiss Buttercream.

In general, Swiss Buttercream has one part egg whites, two parts sugar, and three parts butter. To be considered a Swiss Buttercream, the egg whites and sugar are heated over a double boiler to 110 degrees F. Then they are whipped to medium peak. The softened butter is added until the mixture becomes smooth. Vanilla and a pinch of salt can be added for flavoring purposes. This is how we made it.

We formed the cake as we always do, alternating layers of cake and buttercream, and icing the cake with smooth sides and a smooth top - well, as smooth as possible. We marked the cake into 16 equal slices, formed 16 rosettes, covered the bottom edge in crushed chocolate, and placed 16 chocolate pieces on top. I did a pretty good job on this cake, but you wouldn't actually know by looking at it that it's a red velvet cake. If I made this in the future, I would try to come up with a design for the top of the cake to show it is red velvet. It tasted okay, but I think I'm more modern and would prefer the cream cheese icing.

Sunday, November 7, 2010

Danishes

Monday and Tuesday, November 1st and 2nd were my school's observed days for Fall Break. It's a little later than usual, but it is intended to coincide with Election Day so students can get out and rock the vote. I voted for key races, but sadly, my candidates did not rise victorious. I used the fall break days to catch up on some things around my apartment, and I actually took time to get out and get some exercise which was definitely needed. My friend Mandy and I walked one day throughout the downtown, which is always a great way to explore the great architecture on expensive houses. I also walked one day in James Island County Park, which I really enjoy; it's peaceful and has a bunch of walking trails so it feels like I'm really out there getting "fresh" air.

So last week, I only had two days of class. My nutrition class was fairly laid back, and we spent time reviewing sanitation concepts for our national exam which is in a few weeks. On Thursday, I had a regular day, laminated doughs in the morning and my bakeshop class in the afternoon. In bakeshop we made a chiffon cake which we froze to decorate at a later date. Here's a recap of what we did in laminated doughs.


Pictured here are two types of danishes: apple fontaines and blueberry schnecken. My partner Gilly and I had an awesome day in class, executing some of the best product of the day so that was definitely a positive. I really love this class.

The danish dough is the same dough as the croissant dough we used the previous week. The apple fontaines we made actually have some diced pear as well, in addition to sugar, pecans, and nutmeg. Did you know nutmeg comes from the pit of nutmeg fruit, grown in Grenada? Here's a picture:


Chef gave us some information on nutmeg, none of which I knew previously. I had no idea nutmeg fruit even existed and I never knew where nutmeg comes from. So in the picture you can see the fruit's pit, which is the actual nutmeg that gets ground and used in a variety of baked goods. The red leathery looking skin over the nutmeg is what the spice "mace" is made from - I told you it was fascinating.

Anyway, to make the apple fontaines we cut 3 in x 3 in squares of dough, then used a cutter to cut a portion. The remaining bit was folded over, to give this fountain look. After time to proof, we filled these with our apple/pear filling, and baked them; these got really good rise and good color due to egg wash.

To make the blueberry schnecken, we jelly-rolled a piece of dough with cinnamon and sugar, and then cut the dough into 3/4 in rounds, much like you would to make cinnamon rolls. After proofing, we filled these with the blueberry mixture, egg washed, and baked off. Again, our product got really good rise. I should note that we added an apricot glaze to the product as well, to give it some shine.


That's great lamination. Seriously, check out all of the layers. And they taste pretty great. Another excellent day of pastry.

Monday, November 1, 2010

Snacks for Soccer

I know I don't write often about things I do outside of class, and I was thinking that I possibly should, especially if it relates to food. So, here goes.

On Saturday, I drove up to Columbia, SC, to spend time with the men's soccer coaches and team that I used to work with at the University of Memphis. I keep in touch with some of the coaches and players and I figured it would be better to see them on Saturday so I could actually spend time with them instead of just going to their game on Sunday. Luckily, the head coach invited me for dinner, and I got to spend some quality time with them. It was great!

Anyway, so I decided I would take them some healthier baked goods, and get some feedback on my baking. I made a batch of oatmeal raisin cookies, two loaves of banana nut bread, and three small loaves of super fruit bread. Nothing too fancy here, just down to earth semi-healthy snacks. They seemed to enjoy them and appreciate the thought as much as I enjoyed baking for something other than class. And each recipe turned out well, so that's a nice bonus. I did take a picture of the super fruit bread so I'm posting that for you to see.


One side note: The University of South Carolina mascot is the Gamecock, which I find to be an odd choice. According to the USC website: "Folklore and legend surrounding the gamecock are found throughout the world.The Ancient Syrians worshiped the fighting cock as one of their deities.In China, the gamecock is considered the herald of mortal existence and a symbol of honor, merit, and the west.In ancient Greece, the gamecock was the announcer of the sun and was considered sacred because of its magnanimity, courage, skill, and constancy.In Germany and Hungary, the gamecock is still considered a weather prophet." It goes on to also say: "One possible source for the first link between the University of South Carolina and the gamecock mascot lies with a nickname of one of South Carolina's storied military figures, Thomas Sumter.During the War of Independence, Sumter energized South Carolina in its fight against the British.Perhaps his nickname inspired Professor Colcock to create the transparency cited elsewhere on this page.In his preferred hat, coat, and epaulettes, Sumter donned the colors of the gamecock, and he was well-known for his fearlessness in battle.British officers commonly scorned Sumter as the "South Carolina Game Cock."But the people of South Carolina were proud of Sumter's daunting spirit.Letters and other records indicate that by the 1840s, South Carolinians were praising Sumter as the "South Carolina Game Cock.""

On another side note, I got stuck on the interstate behind a major tractor trailer accident, in which I literally turned my car off. People were out and about walking around and checking out the scene. This was the guy in front of me:


How can you resist that?

Just another magical day in my life, where the ordinary makes things extraordinary.