Saturday, April 30, 2011

Jams & Jellies: Final Practical Exam

For the practical exam in my Jams & Jellies class, we had to create our own tart recipe; a few weeks ago we submitted recipes for a jam/jelly/chutney/relish, a tart dough, a filling, and a garnish. I submitted a plan for cornmeal tart dough, rosemary jelly, blue cheese/shallot cream filling, and red potatoes.

To complete my tart, I first made my rosemary jelly by steeping rosemary in boiling water for one hour then removing the rosemary and cooking the water with apple cider vinegar and sugar until it boiled. I then added the liquid pectin to assist in the gelling process. I also had to correctly process my jelly for this part of the assignment. I next made my cornmeal dough so it could chill properly before being rolled out. I did this a week in advance so my dough was actually frozen between class sessions.

On the second day, I thawed my tart dough and blind-baked it to a very light brown. While it cooled, I used a mandolin to thinly slice red potatoes with the skins on and then cooked them in simmering water to soften them. I them dried them on paper towels before seasoning them with salt and pepper. I next made the shallot and blue cheese cream which had the addition of creme fraiche, white wine vinegar, a little bit of oil, and additional seasonings. Once these components were completed, I assembled my tart.

I took the blind-baked tart dough and spread a layer of rosemary jelly on the bottom of it. I next spooned in a lyter of shallot and blue cheese cream and spread it evenly. I then made a circle around the outer edge of the tart with the red potatoes. This baked until the crust was golden brown, the filling was bubbly, and the potatoes began to curl on the edges.

While the tarts were still warm, I spread another thin layer of rosemary jelly on top and then placed small bits of blue cheese and chives around the tart and garnished the center with a bit of rosemary. Chef really liked my product, as did my classmates. I really liked it too, and I worked on this a great deal to get it just right. I think it looks great and tastes pretty great too.


At the end of class, we had a chance to sample each other's products. It was fun to see that each person came up with an entirely different concept and some really tasty products. All in all, I really loved this class. I feel like I learned a ton of valuable skills and have a great foundation for preserving fruits and vegetables and using them in really creative ways. I am looking forward to some time this summer to try different recipes and come up with different applications for the products. As we say in class, jam on.

Sunday, April 17, 2011

Exam Week

Monday, April 18 starts my week of practical exams. On Monday, I'll be executing my own tart recipe which includes a jelly and a filling with a garnish. I feel really good about this one, and I'll be sure to share more once it's over.

On Tuesday, in my Candies and Confectionaries class, we already took our practical exam - the piping exam we had back in February - so instead we'll be playing around with different types of sugar. This is new so hopefully it will be interesting as well, and since it's not an actual exam, the pressure is off.

On Tuesday afternoon/night, in my Advanced Bakeshop class, we'll be executing a recipe for a macaron torte. This will be the first time ever that I will attempt a final practical exam in school without having practiced it beforehand. I could have made time to do so, don't get me wrong, but I don't have all of the necessary ingredients on hand so I made the decision not to practice. Instead, I invested my time in some side projects that I was more interested in, as it relates to Easter. Hopefully it will work out in the end, but it very well could be the first time in my life I actually miserably fail at something I really care about. (Well, second time of real failure, if you count that whole year-plus debacle of a failed job search.)

When class is over on Tuesday, regardless of how things go with the exam, I'll be greeted at home by my parents and my grandmother, who are making the drive down to spend a few days with me and celebrate Easter. So any negative feelings from class will be easily wiped away by their smiling faces and the thought of the upcoming days of eating great food on their dime. Yes.

I'll have to squeeze in some shifts at work on Wednesday and Thursday, and my final practical exam in my Petit Fours class will be on Friday. I'm executing three recipes, only two of which I have fully practiced, but the third requires skills I have with new reliable recipes, so I think that one will go as planned.

In general, though, I've set a strategy for the week that is unlike any previous exam week in my life. Let's be honest, I've been through a lot of school over the years, and I usually set a plan to dominate exam week. But this time it is different because, like I mentioned, I haven't fully practiced and prepared the way I normally would. (The former academic counselor in me kinda hates myself, and any former students would easily have the right to shove this in my face. Go for it, I won't disagree... anyway.... ) There's two outcomes, of course. It will either be great and I'll feel good about it or it won't be very great and I'll feel bad about it. But that's life, right? You have to pick and choose your battles, and I'm choosing to do all I can really handle in my current state of existence. It's an interesting personal test for me, in a way. I'm trying to rely on the skills I've been developing and the knowledge I've gained without the practice. So this is a testament to the work I've put in over the long haul, and we'll see if it pays off. It might not be the best time for such personal experimentation, you might be thinking, but like I said, I have to pick and choose my battles here so this is the agenda. Time to work. Let's see what happens.

Petit Fours Leftovers

In Friday's Petit Fours class, we used leftovers from previous classes to execute different products while learning how to properly candy orange peel and pipe rosebuds.

To candy orange peel, you first quarter an orange to remove the inside fruit, leaving as much of the peel as possible. You then cut the peel into strips and place this in a pot with water. You bring the water to a boil, then remove the water and repeat this process two more times. This process removes the bitterness from the peel and softens the peel. After the boiling process, the peel is placed in a sugar syrup for about an hour. When done it is set out to remove the moisture. We then tossed some of it in sugar and dipped some of it in chocolate.

Using leftover tart dough, one group made small tarts with a cream cheese filling and fresh fruit garnish. Another group made panna cotta with chocolate shortbread designs and cookie crumbles. My group worked on glazing the leftover chocolate walnut cake, which was then decorated with piped rosebuds. My group also had the chance to coat cake pops in chocolate and them use chocolate to add striping.


The William and French Macarons

In Tuesday's Advanced Bakeshop class on April 12, we finished production of "The William." This is an entrement with four components, a circular almond dacquoise layer on the bottom, topped with crushed hazelnut nougatine, topped with poached bartlett pears, and finished with creme chiboust. "The William" is named for the Bartlett pears because in France they are called Williams pears.


During class, we also had to temper chocolate and make chocolate cigarettes which we'll use next week on our entremet for our final practical exam.

While some class members were tempering chocolate and making their chocolate cigarettes, we had time to experiment with french macarons. Chef allowed us to be creative with size, color, and flavor. My partner for the day, Rebecca, said to me, "Want to use praline buttercream?" Um, hell yes! I love praline buttercream, as I may have mentioned in my post about the Marjolaine. So she and I made chocolate macarons with a praline buttercream filling. We also decided we would make larger macarons instead of smaller ones, and this is what we came up with:


At the end of class, we put together a spread with each of the types. Some had lavender and lemon, some had vanilla but were brightly colored, while others had strawberry. It was really a fun creative day in class and the results were definitely tasty.

Pastillage Centerpiece

In Tuesday's Candies & Confectionaries class on April 12, we finished our pastillage centerpieces. We first had to assemble the pastillage base in the shape of a box. We used the pieces we had cut previously to do this and glued them together with royal icing much like you would assemble a gingerbread house.


After the box was assembled, I had to carefully remove my piped pieces from the sheet protectors. I used my offset baby spatula to help loosen them from the plastic. On the 12 center pieces I piped, I had to turn them over and pipe eyes on the birds for consistency. Only one broke in this process, so that was a good sign. I then had to carefully glue them to the box and to each other using royal icing. Once this was completed, I used my baby spatula to loosen the side ornaments; only 2 of 40 of these had broken so I was in good shape. I then used royal icing again to glue these to the box. At the end, my centerpiece looked like this:


This was a unique exercise. I'm not quite sure I will ever do something like this again, but I learned a lot in the process and would definitely be able to do so if the challenge presented itself. I'm really happy with my result and finished product, and that's always a good feeling.

Sunday, April 10, 2011

Cupcakes

In Petit Fours on 4/8, the final group project was on cupcakes. One group member's recipe included a chocolate cupcake, raspberry filling, chocolate ganache, and raspberry ganache. Another group member's recipe included lemon american poundcake cupcake, lemon curd, and swiss buttercream with a candied lemon peel garnish. The third group member's recipe included a vanilla cupcake with key lime filling and swiss meringue which was garnished with lime zest. The final group member's recipe was an almond pineapple cupcake with a pineapple cream filling and a swiss buttercream.

Piping Project

In my Candies and Confectionaries class, we are working on our final centerpiece project. In class on March 29, we made pastillage. This includes confectioners sugar as the base, water to bloom gelatin, and cream of tartar to maintain a crisp white color. We rolled the pastillage thinly and then cut shapes from it, which we will put together in the shape of a box. This will become our base.

We also began piping the designs for the centerpiece. We have to create 8 pieces to make the center item, which has to be at least 6 inches tall by a little less than 3 inches wide. We then have to create 32 side ornament pieces, which are generally 2 inch circles.

I chose a sketch inspired by the Vera Bradley pattern "Sittin in a Tree." In order to complete my piping, I needed the full class session on 4/5 as well as another 6 hours of time on 4/7. Here's a picture of my ornaments of which I piped 40 total:


And here are two pictures of my centerpieces, of which I piped 12 total:


The hope come this Tuesday is that the pieces stay together so that I can pick them off of the sheet pan and place them on the centerpiece without breaking. Time will tell.

Marjolaine

In Advanced Bakeshop on 3/29 and 4/5, we made a Marjolaine, which has risen to the top of my favorites list. The Marjolaine was created in France by Chef Fernand Point. It has lots of delicious components.

For the base, we used a flourless chocolate cake but traditionally you could use a chocolate genoise. On top of the base is a chocolate ganache and then a dacquoise layer, made from almond flour, sugar, and egg whites. The next layer is Creme d' Or or "golden cream" which is a chocolate whipped cream. Next is another layer of dacquoise and then praline buttercream, which is made from candied hazelnuts. Another dacquoise layer is placed then a stabilized whipped cream. A final layer of dacquoise and then the whole cake is covered in praline buttercream. After setting in the freezer, this was covered in a chocolate glaze, before marking a pattern on the top.


I absolutely loved this. It is extremely rich, but I tend to love anything with chocolate that can be described as rich. And adding in the praline/hazelnut component makes it that much better.

Chutney & Relish Day 2

In Jams and Jellies on April 4, we worked again with chutneys, relish, pickling, and some new applications. We made mango chutney, apricot chutney, and an olive tapenade.


We also made pickled beets (of which I'm generally not a big fan):


Since everything we do in this class goes well with bread, cheese, crackers, etc, Chef thought it would be a fun application to make some of these items. In keeping with the Indian theme of chutneys, we first made lavash which is garnished with sesame seeds before baking.


We next made parmeson thyme crackers and shaped them in lots of different ways using cookie cutters and a scalloped edge pastry wheel:


And finally, Chef taught us how to make roti, which is an Indian flat bread. To do this, you roll out a piece of dough as thinly as possible. You then cook it in a pan for a few minutes on each side. You then place it right on the flame so it puffs up and get some color spots. It's absolutely delicious.


This was our last day of production in this class, and I'm a little bummed out about that. I really enjoyed this class, and learned so many new concepts and ideas. In the next two weeks, we'll be preparing items for our final practical exams. More on that to come.

'80s Flashback for Petit Fours

For the second group project in Petit Fours, the group in charge chose an '80s theme for the day. One group member's recipe was frozen yogurt in homemade comes (made from tuile batter). Another group member's recipe was a take on rice krispies treats, which also included fruity pebbles and were garnished with white chocolate and pop rocks. The third group member's recipe was a "purple rain" cake, which was made using a red velvet cake recipe but dyed purple instead. The cake was cut into rain drop pieces, and decorated with flat icing. The final group member's recipe was a chocolate walnut cake. She used edible paper and an edible printer to create 1 inch squares of album covers popular in the 80s, which were placed on top of the cake covered in ganache. The edible covers are shown here:


And here's a picture of some of the final plating:

Tiramisu and Raspberry Passion Fruit Torte

In my Advanced Bakeshop classes on March 22 and 29, we continued our work with different types of entremets. As I mentioned previously, the tiramisu had piped lady fingers and a cream with mascarpone cheese, coffee, and rum. To finish the tiramisu, we covered the top in chocolate shavings:


We also made a Raspberry Passion Fruit Torte. Like all entremets, this product had lots of different layers and applications. The outer edge of the torte is lined with a joconde layer, which was made using red decor paste to create diagonal lines. This was placed around the edge of a cake ring lined with acetate. We then built the torte from bottom up.

The bottom layer is made from pate sucree, which is traditionally used as a tart dough. We rolled this and cut circles and it had the feel of a thick sugar cookie. We next spread a layer of raspberry jam and then placed on top a layer of raspberry sponge cake, which contained pieces of raspberry. We then spread a thick layer of white chocolate mousse. The next layer was a passion fruit gelee insert, which was made from passion fruit puree, sugar, and gelatin. Another layer of white chocolate mousse was placed next. The entire torte was finished with a top layer of raspberry gelee, which had great shine. After allowing the torte to set up in the freezer for a week, we finished it and unmolded it.


Marzipan Project

I mentioned a few weeks ago that my Candies and Confectionaries class would focus on our marzipan projects, and we spent three full weeks doing so. The goal of the project was to create two centerpieces.

The first centerpiece was a fruit display. During the first class session, I covered the fake-cake base in marzipan and created my fruit pieces, which were apples, pears, pumpkins, figs, and grapes. I then used the spray gun to color the pieces of fruit. During the second class session, I decorated the sides of my cake base with cut out acorns and designs that looked like mini cornucopias. I then piped a border out of royal icing and assembled the fruit pieces in the display. This is what my fruit centerpiece looked like:


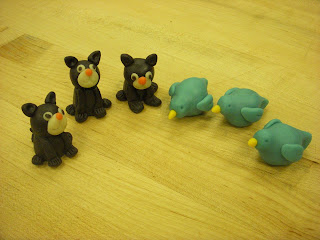
The second centerpiece was an animal display. We had to create 3 sets of 3 animals and then use some of those animals in a storyboard. For two of my animals, I chose to make bluebirds and black cats:


It's no secret that my favorite childhood cartoon is the Peanuts comic strip, and I continue to love all things related to Charlie Brown and his gang. So I chose to make my third animals in the likeness of Snoopy. If you're unaware, Snoopy has siblings. His brother, Spike, for example, lives in the dessert in a cactus and wears a hat. Two of his other brothers, Andy and Olaf, live together on a farm. And another brother, Marbles, plays the banjo and has spots. These brothers make appearances in the comic strip and in different episodes of the show, namely, I Want a Dog for Christmas, Charlie Brown. I found an image online of the classic poker scene, and it served as inspiration for my project. Here's a copy of the image:


And here's the execution of my centerpiece:


All in all, I felt really good about my centerpieces. We spent three class sessions on these projects - which is a good 19 hours of work - in learning how to work with this product and doing so in creative and different ways. These creative things are not really my thing, overall, but I feel like my skills have grown a great deal through this project.

Chutney & Relish

In Jams & Jellies on March 28, we made chutneys and relishes. For definition's sake, a chutney is a spicy condiment made from fruit, vinegar, sugar and spices. Chutneys originated in India, and mango chutney is the most popular. Apples or onions usually make up the base for chutneys; they can have a variety of textures from smooth to chunky and a variety of flavors from mild to spicy. Long slow cooking helps develop the flavors, and chutneys are better after a few days or weeks since the flavor will continue to develop over time.

My group made an Indian Chutney. We combined chopped onions, raisins, vinegar, orange, lemon, lime, brown sugar, molasses, ginger, garlic and mustard seeds in a pot which was brought to a boil, reduced, and then boiled gently for about 30 minutes, until the fruit softened and the mixture thickened. We then added additional spices like hot pepper flakes, cinnamon, cloves, allspice and pepper. This was a spicy chutney and I liked it a lot.

In the most traditional sense, a relish is a pickle that has been chopped up rather than left whole. Like chutneys, relishes can be sweet or sour, mild or hot, and they are made from different fruits, vegetables, herbs and spices. Relishes are also better over time since the flavors can continue to develop. Unlike chutneys, it is important with relishes to cut the fruit or vegetables to the same size, so the pieces cook consistently and retain their crunch. Green pickled relish, like you see on hot dogs often, is a traditional relish; chow chow is a traditional southern relish.

One group in class made chow chow which contained cabbage, cauliflower, green tomatoes, onion, red and green bell peppers, salt, sugar, and spices such as celery seed, dry mustard, turmeric, ground ginger and vinegar.

My group made a caramelized red onion relish. We peeled and sliced rings from large red onions, and cooked them until they began to caramelize with brown sugar. This took about 25 minutes. After we stirred in dry red wine and balsamic vinegar, and continued to cook until the liquid evaporated and the onions took on the deep flavor. We added salt and pepper to taste.

Our application for class was to make a tart using a Parmesan tart dough, the caramelized red onions, and an egg custard filling (similar to a quiche filling). We fully baked the tart dough, then spread a layer of the onions and covered it with the egg custard, which also contained rosemary. We dropped in pieces of goat cheese and baked it until a light golden brown. We garnished it with parmesan chips and rosemary. Absolutely delish.

Saturday, April 9, 2011

Nuts in the Kitchen

In my Petit Fours class on March 25, my group had the responsibility to run our class session. The assigned group project required us to select a theme and then come up with individual recipes that would contribute to the theme. My group chose the theme "Nuts in the Kitchen." We wanted to highlight different types of nuts in four different applications, and we worked extremely hard to conceptualize four products that would work together. Our products brought different tastes, textures and applications while using the colors of tan, brown, and white in harmony.

My friend Mandy chose to do a bourbon-pecan tart, which had a similar look as a pecan tassie. She used a pecan short dough as the base and a bourbon pecan filling. After cooling, she used melted dark chocolate to add some striping and then topped each one with a bit of bourbon flavored chantilly cream. These were delicious.


My friend Joanne chose to do an almond sponge cake with amaretto cream. She made an almond sponge cake then used circle cutters to cut smaller pieces of cake. She layered in the amaretto cream then topped each off with a white chocolate disc and an almond garnish. Also delicious.


My friend Gilly made a hazelnut french macaron with a chocolate ganache filling. Macarons traditionally have almond flour so this was a different take on this item. I love hazelnuts and ganache so I loved the taste of these as well.


I chose to make a homemade peanut butter cream cup. To do this, I used paper petite cups and brushes to create the chocolate cup. After unmolding, these were filled with a peanut butter cream, which had tiny pieces of actual peanuts, peanut butter and a pastry cream with a few other ingredients. I then used melted dark chocolate to pipe garnishes. Any peanut butter lover would enjoy this. Seriously, not to sound conceited, but I think it could give Reese's a run for its money.


We had to present our products in a creative way so my group members and I spent a few hours one afternoon coming up with different ideas. This is what we chose, in the middle, which is surrounded by the plates from our other classmates:


These types of projects require a lot of time and effort, but in the end, they are the experiences where I feel I learn the most as a student. This project helped me learn more about conceptualizing a theme from beginning to end, and taking into consideration many different factors like texture, appearance, taste, size, color, etc. It was really worth the effort, and we felt really good about our idea and our execution.

Thursday, April 7, 2011

Leftovers & Pickles

I had a full week off from school for spring break, which I spent in Florida with my mom, aunt, cousin, and grandmother. We stayed on Disney property and schlepped our way around Magic Kingdom, Epcot Center, Animal Kingdom, and Hollywood Studios. We also went to two Phillies Spring Training games. We spent a great deal of time eating, which was great because the food was good and the desserts were even better.

I returned to school on March 21 for my Jams & Jellies class. We did two things during this class session - we made tarts and rugelach out of leftovers from previous weeks, and we made pickles and other pickled items.

This is rugelach, which is made from a pastry dough that is rolled like a mini croissant and filled with jam and nuts. Ours had apricot jam which we made in the course and crushed pecans.


These are some of the tarts. These contain frangipane and different types of jams and garnishes:


Pickling is really fun, and I greatly enjoyed my first true pickling experience. Pickles are preserved with salt and vinegar. We made traditional pickles by slicing cucumbers and slicing onions and layering them in a container. We then placed sugar, white vinegar, cider vinegar, pickling salt, mustard seeds, celery seeds, and ground tumeric in a pot and brought it to a boil. We then poured this mixture over the pickles.


We followed a similar process for pickling green tomatoes. We layered slices of tomatoes with slices of jalapeno peppers, boiled the vinegar mixture and poured it over the tomatoes:


We also made pickled green peppers which again followed a similar process.


The other groups made pickled ginger, pickled cantaloupe, pickled asparagus, and pickled carrots. During class on March 28, we sampled each of these items because they need a few days to take on the flavor. The green tomatoes were my favorite, and I plan to make these at home so I can experiment with frying them and eating them on some homemade burgers. Yum.